

How To Set The Time On Instant Pot

If you're new to the Instant Pot pressure cooker and find yourself confused by all the buttons on the front control panel, this article is for you. It'south also for more experienced Instant Pot cooks who perhaps never use the smart programs because they don't know how or why. In this detailed mail, we will wait at the about common Instant Pot settings and buttons across models, explain how they piece of work and the best ways to use them (equally well as when it's improve to use the manual settings).
Yous might exist wondering, does anyone really use all those Instant Pot buttons? Some people discover them to be a guiding light and others are put off past just how many in that location are. It also doesn't help that many recipes designed for the Instant Pot tend to utilise manual settings rather the pre-programmed options.
We've decided to dive deep into the world of Instant Pot buttons to bring you this definitive guide. This is probably the most in-depth, detailed article on Instant Pot settings on the Internet so we've got some quick links for you to navigate to the button you're most interested in learning about.
Yous might also want to check out our guide on How To Use The Instant Pot For Beginners here.
- How practice Instant Pot buttons work in a nutshell?
- Instant Pot Manual Setting (Force per unit area Cook Button)
- Soup/Broth Setting
- Meat/Stew Setting
- Bean/Chili Setting
- Poultry Setting
- Rice Setting
- Multigrain Setting
- Steam Setting
- Boring Melt Setting
- Saute Setting
- Instant Pot Yogurt Setting
- Continue Warm Setting
- Delay Commencement Setting
- Abolish/Stand By Mode Button
- Cake, Egg & Sterilize Settings
So, how do Instant Pot SETTINGS work?
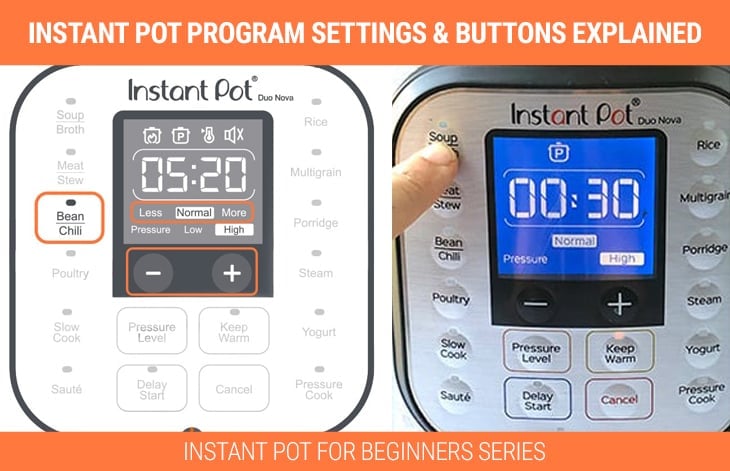
Each Instant Pot setting push button is substantially a SMART PROGRAM selection. Most smart programs, or buttons, just fix the pot to High or LOW pressure for a specific period of time most closely aligned with the food it is meant to cook. For example, the default SOUP button sets the pressure cooker for thirty minutes at HIGH pressure, which y'all could use to cook any nutrient that requires that much time and pressure level.
If you lot press each SMART setting push more than than once, it will toggle betwixt Normal, Less or More options, which gives y'all more command of time, temperature or default pressure level. For instance, the RICE push tin exist set to Less or More than depending on how soft or firm yous like your rice or the type of rice you might exist cooking.
Some buttons don't use the pressurizing function of the Instant Pot. For example, Slow Cook and Sauté settings use the heating element that sits underneath the inner pot. They are programmed for heat level and time.
To keep information technology super unproblematic, information technology is possible to use the Instant Pot for all recipes using only a few of import buttons. With the Pressure Melt or Manual (on older models) buttons in addition to the Pressure Level and [-] and [+] buttons, you can command the time and force per unit area which are otherwise preset for the rest of the buttons. This will work for any recipe that requires force per unit area.
For not-pressure cooking, the Sauté, Deadening Cook and Yogurt buttons help you accomplish a similarly custom cooking setting.
Instant Pot Duo CLASSIC, NoVA & other basic models
Let'southward exercise a quick rundown of all the Instant Pot settings, also known as "i-bear upon" or "smart" program buttons, on the control panel of Instant Pot Duo Nova & Duo Classic models. The Duo Nova is the recommended Instant Pot for beginners and that's what we used to put together this guide.
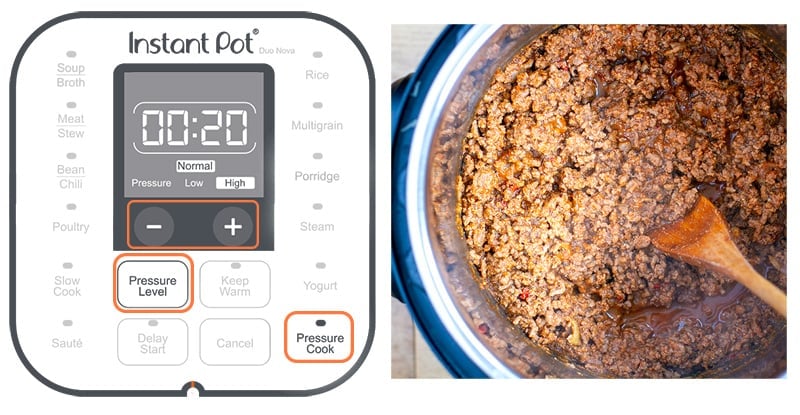
Instant Pot Manual SETTING (Pressure Cook Push)
Depending on the model, the Instant Pot transmission setting button volition either say Pressure Cook or Transmission. This is the setting you're probable to use the near. The temperature, pressure level and cooking times tin can exist adjusted on the control panel.
- Turn the Instant Pot on. It should say OFF on the screen, indicating it's in the Stand-By mode.
- Select Force per unit area Cook button (Manual on older models). The default settings will be Normal mode (35 minutes cooking time) on High force per unit area. If you press the Pressure Cook button once again, it volition change from Normal way to Less or More, which only changes the automatically programmed cooking time. Less would be 20 minutes and More would be 45 minutes.
- Use the +/- keys to modify the cooking time in each mode. In most cases, you will leave information technology in Normal mode and only arrange the fourth dimension as needed.
- Employ Pressure Level push to conform the pressure level; press information technology to toggle between Loftier and Depression. For about recipes, yous will use Loftier pressure level except for cooking more delicate foods similar fish, seafood or fast-to-cook vegetables.
- With the manual setting, you tin can use Natural Release or Quick Release or a combination of both once the cooking is done.
See our step-by-step mail service for how to utilise the Instant Pot with manual settings here.
Instant Pot SOUP Setting (SOUP/Broth Button)
The default Instant Pot soup setting is pre-programmed to prepare the pot to cook at HIGH pressure for 30 minutes. The soup program brings the contents of the pot to a irksome simmer and results in a clear broth due to lack of boiling motion. Below is how to utilise the Soup/Broth setting on Instant Pot. Check out our 35+ Best Instant Pot Soup Recipes hither.
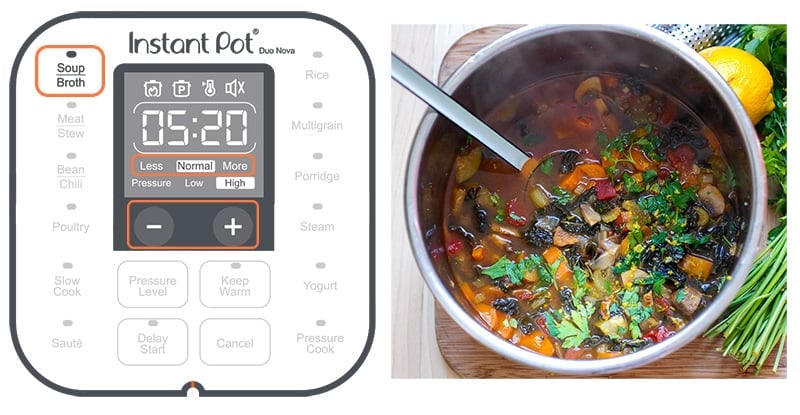
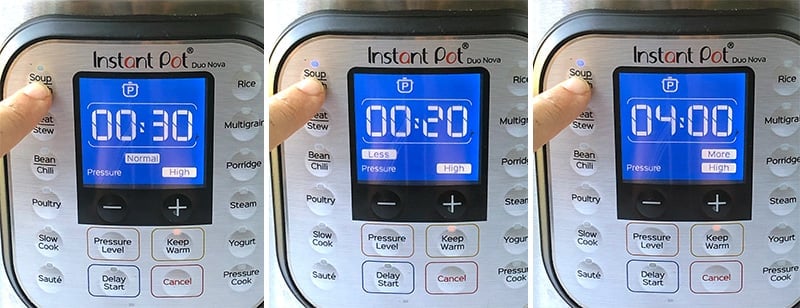
- Turn the Instant Pot on, it will say OFF to point the Stand up-By mode. Add all ingredients, seasonings and liquids to the pot and stir. Secure the lid on superlative. Printing the Soup button. It will say Normal, xxx minutes at Loftier Pressure. If you press the Soup push button once again, you can conform the mode from Normal to Less or More (this just changes the cooking fourth dimension).
- Normal mode – thirty minutes at High pressure – recommended for soups with meat.
- Less mode – 20 minutes at Loftier pressure – recommended for soups without meat.
- More than mode – 4 hours at Loftier pressure – recommended for soups that require longer cook times such every bit rich os broths. Release the pressure level naturally.
Use the − / + buttons to farther customize the time. The cooking time may be adjusted at whatsoever time during pressure cooking.
INSTANT POT SOUP COOKING TIPS
We find that most vegetables, including potatoes, don't need the total twenty minutes at Loftier force per unit area and volition ofttimes overcook and get too soft, and so for near vegetable-based soups, five to ten minutes at Loftier pressure level is usually enough.
If you're cooking something like a beefiness and vegetable soup, you may choose to pressure melt in ii stages: set up to cook the meat in a broth with some onions, carrots and celery on Soup/Less mode, and so release the pressure and add the residuum of the vegetables. Secure the hat again and assault Pressure Cook/Manual or Soup/Less fashion and adjust the time to 5 minutes.
Well-nigh soups utilize a lot of liquid, so it is recommended that you release pressure level naturally once the cooking timer is done. Simply leave the Instant Pot undisturbed. Even so, the foods within continue cooking at a slower rate while the pressure level is released. You can always release pressure naturally for five-10 minutes and so use the quick release method.
Should you sauté first? In some cases, y'all may desire to saute foods like onions, garlic, carrots and celery or to brown the meat get-go, which tin add more flavor to the soup. In this instance, press the Sauté setting first and cook off the vegetables in a little oil or fat for three-4 minutes uncovered. And then add together the residue of the ingredients and liquid, secure the hat and cull the Soup setting in whatever mode yous like.
INSTANT POT Meat/Stew SETTING
The meat and stew setting is best for cooking large or tough cuts of meat at high pressure level. This push button can exist used for cooking meat pieces in a little broth or stews that contain meat in them. Beneath is how to use the Meat/Stew setting on Instant Pot.
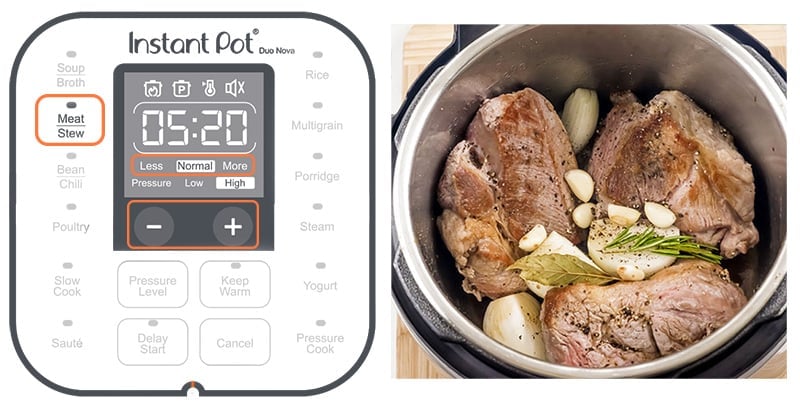
- Turn the Instant Pot on, it volition say OFF to indicate the Stand-By mode. Add together meat, seasonings and liquids to the pot. Secure and lock the hat. Select the Meat/Stew button. The default Instant Pot meat setting is pre-programmed to set the pot to cook at Loftier pressure for 35 minutes, which is suitable for most dishes like beef stew or pulled pork. If you press the Meat/Stew button again, you can conform the mode from Normal to Less or More (this simply changes the cooking time).
- Less way – 20 minutes at Loftier force per unit area – for soft texture meat; smashing for diced steak, pork or lamb, pork or beefiness ribs, ground meat similar when making taco meat or Bolognese sauce, and about stews that utilize diced or ground meat.
- Normal mode – 35 minutes at Loftier pressure – for very tender meat texture; great for slightly larger pieces of meat and for stews that use tougher cuts of meat like Beef Bourguignon or braised beef cheeks.
- More manner – 45 minutes at High force per unit area – for fall-off-the-bone texture; great for pork shoulder, beefiness pot roast or lamb roast.
If desired, utilize the − / + buttons to further customize the time. The cooking time may be adjusted at whatever time during pressure cooking.
INSTANT POT MEAT COOKING TIPS
Allow meat to "residue" for 5-xxx minutes, depending on size. It will reabsorb cooking juices for tender, succulent meat. Substantially, what this means is that you lot should allow the Instant Pot to release pressure naturally when possible.
Should you sauté beginning? In some cases, you may want to brown off the meat first or sauté foods like onions, garlic, carrots and celery, which can add more flavour to the dish In this example, printing the Sauté setting first and sear the meat on both sides in a little oil or fat for 1-2 minutes uncovered. So add the rest of the ingredients and liquid, secure the hat and choose the Meat/Stew setting.
INSTANT POT Edible bean/chili SETTING
The Bean/Chili setting push button can be used to melt larger dry legumes such equally beans and chickpeas in liquid or to cook chili or another type of stew that uses dry beans. The programme settings (Less, Normal & More) apply High pressure and issue in different doneness of beans. When cooking beans, always employ NR (natural release) to release force per unit area afterward cooking is done. Beneath is how to employ the Bean/Chili setting on Instant Pot.
- Plough the Instant Pot on, it volition say OFF to indicate the Stand-By mode. Add dry out beans, liquid and common salt to the pot. Secure and lock the lid. Select the Edible bean/Chili push. The default setting is pre-programmed to set the pot to cook at High pressure for xxx minutes. If you lot press the button once again, y'all tin adjust the mode from Normal to Less or More (this simply changes the cooking time).
- Less mode – 25 minutes at High force per unit area – for a firmer bean texture or to melt black beans, dry out lima beans, Navy beans, black-eyed peas, Adzuki, anasazi, dry peas.
- Normal mode – 30 minutes at Loftier pressure – for a softer edible bean texture or to cook cerise kidney beans, white kidney beans (cannellini), Pinto beans, black-eyed peas (for softer texture).
- More than mode – forty minutes at High force per unit area – for a very soft edible bean texture or to cook harder legumes like chickpeas and soybeans (increase time to 45 minutes).
COOKING TIPS
- Ensure dry beans are completely submerged in water. Dried beans double in volume and weight later soaking or cooking. To avoid overflow, please exercise not make full the inner pot more to the ½ marker to let for expansion.
- Although non necessary, soaking the stale beans tin can speed upwards cooking significantly. Immerse the beans in 4 times their volume of h2o for 4-six hours. Cooking times for pre-soaked beans at High pressure tin exist halved from the program settings (on average).
- Lentils (light-green and brown) only need x minutes at High pressure, so you could apply the Less mode and manually adjust the time or apply the Manual setting instead.
Note: You can as well utilize the Multigrain setting to cook most beans. Bank check out these Mouthwatering Instant Pot Chili Recipes With A Twist.
INSTANT POT Poultry SETTING
The poultry Instant Pot setting is best for cooking…you guessed it…chicken! The mode you cull depends on the size of the craven pieces and the cut as craven chest needs less cooking time and is hands overcooked compared to craven thighs.
Y'all tin utilize this setting to cook chicken meat or a dish that contains poultry in it such as chicken and potatoes or chicken and rice (see more notes on this below). Poultry setting is simply available on six-quart and eight-quart models, not on the mini! Below is how to employ the Poultry setting on Instant Pot. Check out our 45+ All-time Instant Pot Chicken Recipes hither.
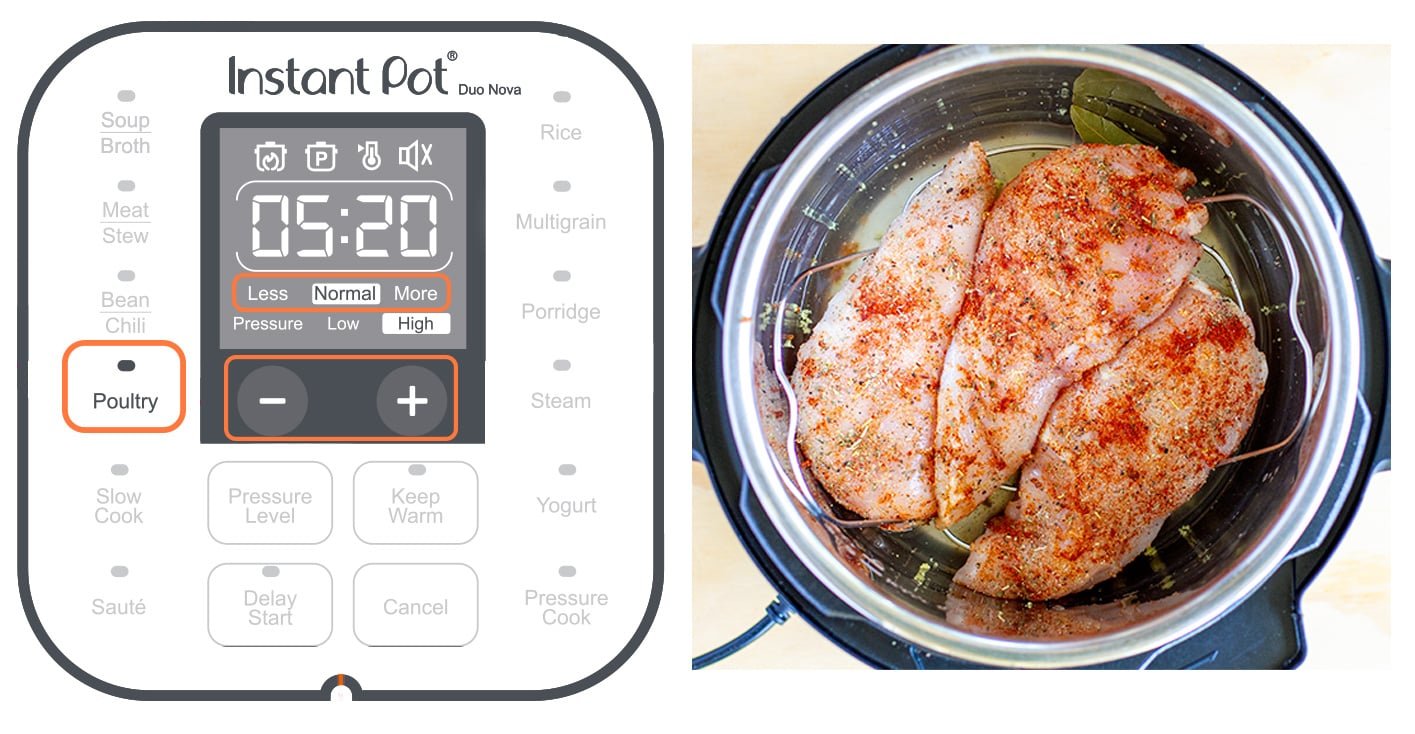
- Turn the Instant Pot on, it will say OFF to indicate the Stand-By mode. Add chicken, seasoning and liquids to the pot. Secure and lock the chapeau. Press the Poultry button. The default setting is pre-programmed to prepare the pot to cook at HIGH pressure for 15 minutes, which is suitable for larger pieces of chicken. If you press the Poultry button over again, y'all can adjust the mode from Normal to Less or More (this simply changes the cooking fourth dimension).
- Less style – 5 minutes at High pressure level – for soft texture meat; bang-up for thinly sliced chicken breasts or diced chicken cubes (use Natural Release after cooking), diced chicken and rice or potatoes, vegetable soup with diced chicken, craven wings.
- Normal mode – fifteen minutes at High pressure – for very tender meat texture; great for whole chicken breasts, craven thighs and drumsticks cooked in broth or on tiptop of a trivet. For chicken breasts, you may want to reduce the time to 10 minutes to avoid overcooking and allow 5 minutes of natural release.
- More mode – thirty minutes at High force per unit area – for fall-off-the-bone texture; great for cooking a whole craven on acme of a trivet, which you tin can finish briefly in the oven for extra color, equally well as for super-soft, braised chicken meat and craven stock.
If desired, use the − / + buttons to farther customize the time. The cooking fourth dimension may be adjusted at whatsoever time during pressure cooking.
COOKING TIPS
Allow poultry to "remainder" for 5-ten minutes, depending on size. It will reabsorb cooking juices for tender, delicious meat. Essentially, what this means is that yous should allow the Instant Pot to release pressure naturally when possible.
Should yous sauté commencement? In some cases, you may want to chocolate-brown off the meat first or sauté foods like onions, garlic, carrots and celery, which can add more season to the dish In this instance, press the Sauté setting outset and sear the meat on both sides in a piddling oil or fat for 1-two minutes uncovered. Then add the rest of the ingredients and liquid, secure the hat and cull the Poultry setting.
INSTANT POT Rice SETTING
This button is fabricated for cooking medium and long-grain white rice. The Rice setting uses low force per unit area and a 10-infinitesimal natural release is recommended for perfect results, however, nosotros institute that 2-3 minutes natural release followed by quick release is sufficient. Below is how to use the Rice setting on Instant Pot.
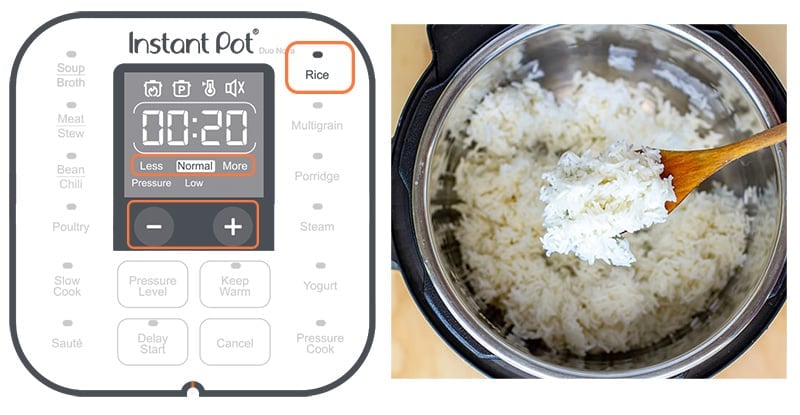
- Plough the Instant Pot on, it volition say OFF to indicate the Stand up-By mode. Add rice, water or stock and seasoning if you wish. Secure and lock the hat. Press the Rice push button. The default setting is pre-programmed to gear up the pot to cook at Depression force per unit area for 12 minutes, which is suitable for slightly larger rice kernels. If you press the button once again, yous can adjust the way from Normal to Less or More (this simply changes the cooking time).
- Less mode – viii minutes at Low pressure level – tender but house to seize with teeth texture; corking for thinner white rice such every bit Basmati and Jasmine rice.
- Normal style – 12 minutes at Depression pressure – for normal texture white rice; neat for regular medium to long-grain white rice and for more al dente Arborio risotto rice.
- More mode – 15 minutes at Depression force per unit area – for softer texture white rice; great for slightly softer risotto.
If desired, use the − / + buttons to farther customize the time. The cooking time may be adjusted at whatever time during pressure cooking.
RICE COOKING TIPS
- one cup of dry white rice usually yields 3 cups of cooked rice.
- Depending on the volume of rice, cook time may range from viii–15 minutes. So, if viii minutes is commonly plenty for 1-2 cups of dry Basmati rice, y'all may need to adapt to ten minutes for say 3 cups of dry Basmati rice.
- Unless you're making risotto using Arborio rice, you should always rinse white rice iv-five times under cold water. This will remove some of the starch and result in fluffier, more separated cooked rice.
- The perfect grain to water ratio is 1 cup white rice to 1.25 cups liquid; if cooking risotto rice, the ratio is one cup Arborio rice to 2 cups liquid (or even more depending on the consistency you lot similar).
- Brownish rice and wild rice crave much longer cooking times and are all-time suited to Multigrain or Transmission settings.
- Check out our post on How To Cook Rice Hither for more details and photos.
Instant Pot Multigrain SETTING
This setting is best suited to cooking tougher, whole grains like chocolate-brown and wild rice, farro, millet and steel-cut oats; it can also be used to cook dry beans and a mixture of grains and legumes. We observe that this is i of the most confusing functions for people considering some of the recommended transmission cooking times for grains don't match the pre-programmed setting times, so it's difficult to know when to apply this function. Below is how to apply the Multigrain setting on the Instant Pot.
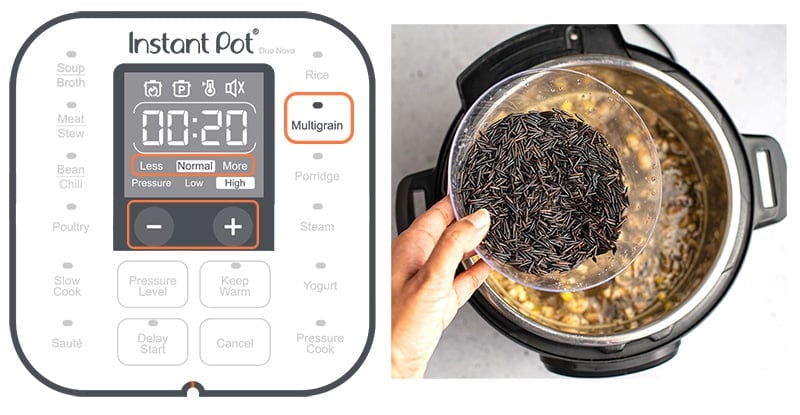
- Turn the Instant Pot on, it will say OFF to indicate the Stand-By mode. Add together the grains, liquid and seasoning if you wish. Secure and lock the lid. Press the Multigrain button. The default setting is pre-programmed to set the pot to cook at High Force per unit area for twoscore minutes. If you press the Multigrain button again, you can adjust the manner from Normal to Less or More.
- Less style – 20 minutes at High pressure – use this way for dry brown rice, wild rice, black rice and allow natural release afterward cooking. You will get slightly firmer to bite wholegrain rice. This button is also suitable for making rice congee/porridge. Farro, millet, and Kamut grains volition also turn out not bad with Multigrain Less setting and natural release. Yous can also choose this setting for cooking dry black beans, lima beans and black-eyed peas with natural release after.
- Normal mode – 40 minutes at Loftier pressure – employ this mode for cooking brown rice, wild rice and black rice that will accept a softer texture when cooked. Information technology'southward as well great for barley, spelt berries and wheat berries, ground coarse polenta, mung beans, chickpeas, soybeans and other firmer or larger-sized dry beans. Allow natural release when cooking is done.
- More way – 45 minutes warm water soaking + threescore minutes at Loftier-pressure level cooking – this function is a little different in that it will first oestrus up the water in the pot and permit the grains soak in it for 45 minutes, after which the pressurizing and cooking will begin for sixty minutes. This setting is suitable for cooking actually tough grains or a mixture of grains and beans. More than specifically, this is useful when you lot're making a larger batch of grains similar barley and wheat berries or chickpeas as the volume of the nutrient might require slightly longer cooking time and pre-soaking can be beneficial. For example, this would be a good part to apply to make a large batch of wild rice and beans together or say brown rice and chickpeas in one pot.
If desired, employ the − / + buttons to farther customize the time. The cooking time may be adjusted at whatsoever time during pressure cooking.
If cooking dry beans, ensure they are completely submerged in water; the same if you're making a mixture of grains and beans.
INSTANT POT Porridge SETTING
The porridge setting on the Instant Pot can be used to cook oatmeal using old-fashioned oats and steel-cut oats, rice porridge and congee or porridge-like dishes that apply a mixture of grains that expand in liquid. Ideally, y'all should use natural release when cooking high-starch foods that aggrandize or a combination of 5-ten minutes natural release and quick release to follow. Beneath is how to use the Porridge setting on Instant Pot.
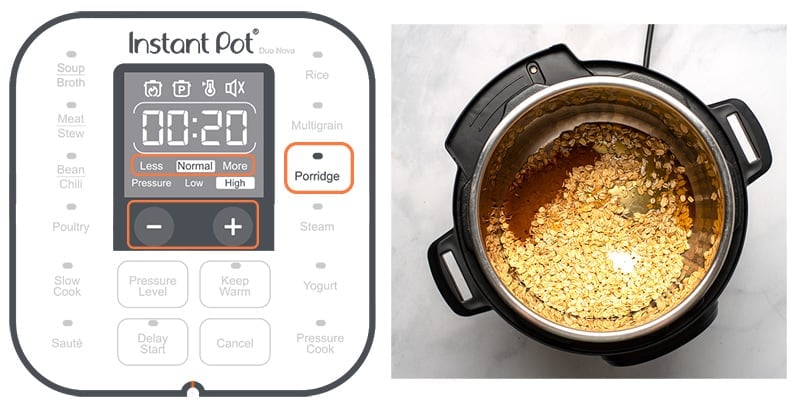
- Turn the Instant Pot on, information technology will say OFF to indicate the Stand-By mode. Add together the grains, liquid and spices or fat if you wish. Secure and lock the lid. Printing the Porridge button. The default setting is pre-programmed to set the pot to cook at High pressure for 20 minutes. If yous press the Porridge push button once more, you can suit the mode from Normal to Less or More.
- Less mode – 5 minutes at High pressure level – this is suitable for cooking rolled (Old Fashioned) oats and risotto-like porridge or rice porridge with slightly firmer to seize with teeth texture.
- Normal fashion – 20 minutes at High pressure – use for steel-cut oat porridge or rice porridge with a slightly softer texture and for making congee.
- More way – xxx minutes at Loftier pressure – use for a porridge/congee that contains a mixture of beans or tougher grains.
If desired, apply the − / + buttons to farther customize the fourth dimension. The cooking time may be adjusted at whatever time during pressure level cooking.
Water to rice & oats ratios for porridge and oatmeal dishes
- Rolled oats (Old-Fashioned Oats): 1 cup oats to two-3 cups water depending on how thin or thick yous like your oatmeal. Porridge/Less Mode with natural release. Recipe for rolled oats with cinnamon and banana here.
- Steel-cutting oats: 1 cup oats to three-three.5 cups water. Porridge/Normal fashion with natural release.
- Arborio rice: i cup rice to 2 cups water. Porridge/Less mode with natural release.
- Congee/rice porridge: 1 cup rice to 4-six cups water depending on how thick or thin y'all similar it. Porridge/normal mode with natural release.
- Rice pudding: one loving cup curt-grain or medium-grain rice to 3 cups liquid (water + milk). Porridge/Less mode with natural release. You tin do i cup water + 1 cup milk for cooking and add an additional cup of milk or some cream at the finish, together with some butter.
INSTANT POT STEAM SETTING
The Steam setting on the Instant Pot is perfect for cooking vegetables, fish and seafood, tofu and whatever other nutrient that is suitable to steaming. This function uses Depression pressure, which helps to avoid overcooking the nutrient and ways that the Instant Pot will come to pressure quicker.
You demand to use the trivet/steam rack provided to elevate nutrient from cooking liquid. Always employ QR (quick release) to forestall nutrient from overcooking. Beneath is how to utilize the Steam setting on Instant Pot.

- Turn the Instant Pot on, information technology will say OFF to signal the Stand-Past style. Add together a cup of water to the inner pot and place the trivet on top. You tin place the vegetables or a slice of fish or thinly sliced chicken on summit of the trivet OR you can utilise an additional steam basket or a circular pan with holes that fits inside the pot. A steamer basket might be useful for smaller-sized vegetables or cutting-up vegetables to prevent them from falling into the water.
- Secure and lock the lid. Press the Steam button. The default setting is pre-programmed to set the pot to cook at Low pressure for 10 minutes. If you press the Steam push once again, y'all tin adjust the style from Normal to Less or More.
- Less manner – iii minutes at Depression pressure – utilize for steaming vegetables like broccoli, Brussels sprouts, carrots, peas, snow peas, bok choy, asparagus so on. Also great for steaming fruit like apples, pears, peaches, apricots and plums. This mode is also a skilful setting for cooking fresh shrimp. Practise not use root vegetables like beets, sugariness potatoes or white potatoes as have longer to cook.
- Normal manner – 10 minutes at Low force per unit area – use for steaming fresh fish like salmon or white fish fillets, fresh clams and mussels, and for cooking frozen shrimp; dumplings tin also exist steamed using this setting mode – use 10 minutes for frozen and reduce the fourth dimension to 7 minutes for freshly-made or defrosted dumplings/potstickers.
- More way – 15 minutes at Low force per unit area – use for steamed sliced or cubed butternut squash, new baby potatoes, cubed beets. You can also employ it to steam sliced chicken chest. For the whole chicken breast, you will demand to manually increase the time to 20 minutes. You can also steam condensed milk into caramel only yous will need to increase the time to forty minutes.
- If desired, use the − / + buttons to further customize the time. The cooking fourth dimension may be adjusted at any time during pressure cooking.
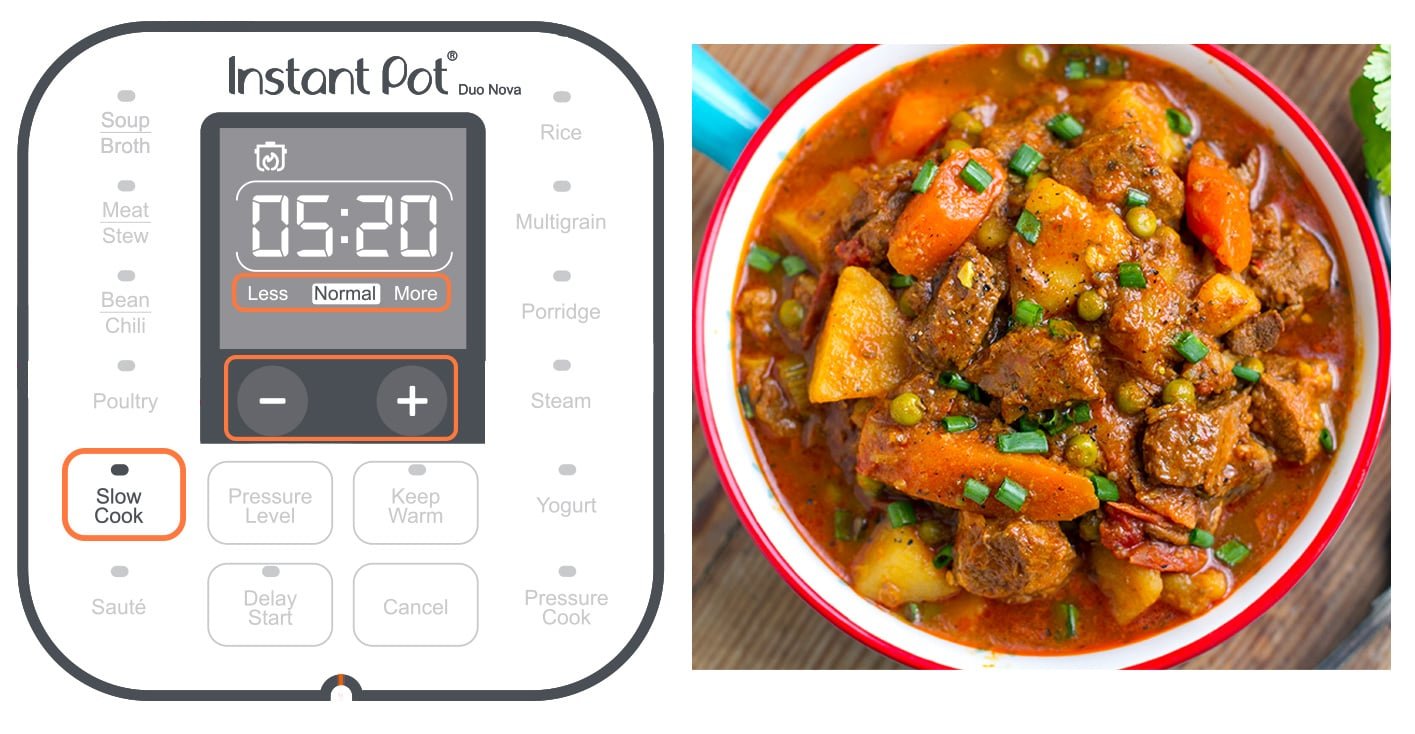
INSTANT POT SLOW COOK SETTING
The Slow Melt is a non-pressure cooking setting that is compatible for use with whatever common slow cooker/Crockpot recipe. The pot is heated but is non pressurized and the Less, Normal and More modes correspond to Low, Medium and Loftier dull cooker settings merely you lot will need to arrange the time manually.
Y'all might want to employ this setting for making dishes ahead of time while you're away from home or overnight. There are times when slow-cooking might work better for certain recipes than quicker force per unit area cooking. Below are the steps for how to use the Slow Cook setting on Instant Pot.
- Add food and liquid ingredients to the inner pot. Y'all might cull to Sauté some foods first if specified in a particular tiresome cooker recipe. If you do, make certain to printing Cancel to stop the Sauté part before yous go on with Dull Cooking.
- Once all the food and liquids are in the pot, identify and close the lid or apply a glass hat with a venting hole. If using Instant Pot'due south regular hat, press the quick release button down until information technology clicks and locks into the Vent position. This is important for tiresome cooking! On Duo Classic models, turn the steam release handle to the Venting position.
- Press Slow Cook setting. Yous can press the Slow Cook push button again to cycle through the Less, Normal and More than temperature options. Less is the same as Low (180-190F) on a slow cooker, Normal is Medium (190-200F) and More is Loftier (200-210F) temperatures.
- Use the − / + buttons to adjust the cooking fourth dimension as needed for your specific slow cooker recipe. For case, if a recipe says 'half dozen hours on Loftier', choose More setting mode and conform the time to 6 hours.
- After ten seconds, the cooking timer will announced and will start counting down. You tin can cull to leave the Keep Warm setting selected (default) or press information technology once more to turn information technology off. If left one, it will proceed the nutrient warm when cooking is done.
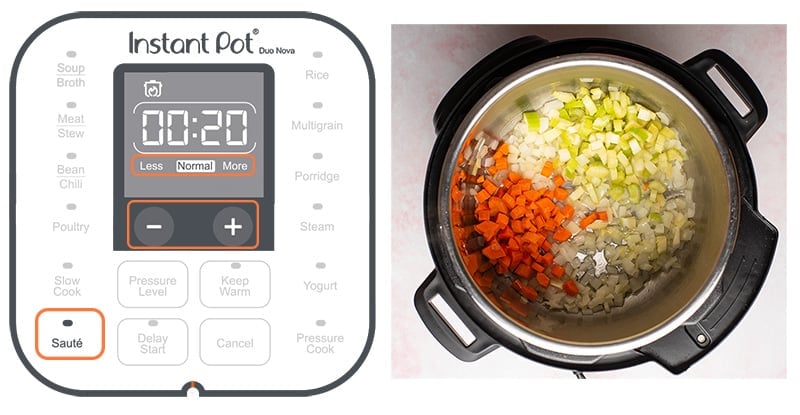
INSTANT POT SAUTE SETTING
The Sauté is another non-pressure cooking program that can be used in place of a frying pan or flat-top grill. For recipes that telephone call for browned onions or garlic, it's important to sauté them before adding liquid to the pot every bit yous will release a lot of flavour this way.
Another reason to sauté starting time is for browning meat. Lastly, sautéeing before cooking is a great way to increase rut and reduce the amount of fourth dimension your pot will take to come to pressure.
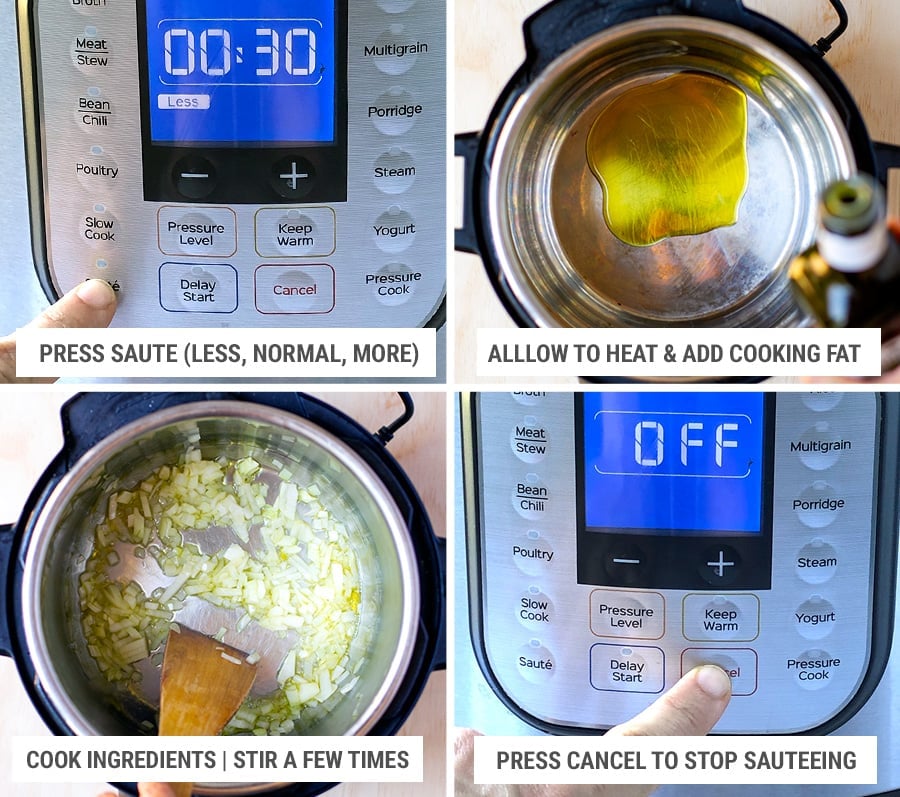
- Star the Instant Pot. Insert the inner pot into the cooker base. Practice not use the lid for the next stride.
- Select the Sauté button. Afterwards x seconds, the cooker displaysON to indicate that it has begun heating. When display switches from On to Hot, add ingredients you want to brown.Notation: You tin can add together ingredients before the Hot message appears; if yous do, information technology may non appear at all. This is normal.
- The control panel will display a xxx-infinitesimal countdown timer equally a maximum Sauté fourth dimension, you lot tin use information technology for reference if you like or adjust it using -/+ buttons.
- The default temperature setting for Sauté function is Normal mode. Press Sauté button again to cycle through for Less andMore than modes (temperature options). Apply Normal for full general pan searing or sautéing, Less for simmering, thickening and reducing liquids and More for Stir-frying or browning meat.
- Printing Cancel to stop the Sauté process. It is recommended to deglaze the inner pot to ensure food items do non scorch during pressure cooking. To deglaze, add together some liquid (e.g. water, broth, wine) to the hot pot. Use a wooden or silicone scraper to loosen anything that may be stuck to the lesser of the inner pot. If y'all dark-brown meat, remove information technology from the pot first.
- Add any other ingredients and liquids. Stir if needed or leave layered and continue with the manual or smart plan settings to pressure level cook the food.
USING SAUTE Office AFTER COOKING
The Sauté part is also useful for finishing the dish afterward pressure cooking is done. One time the pressure has been completely released, open the lid and and then press Sauté button again. Printing the button once more to cycle through Less or More than for lower or higher temperatures.
Utilise it for:
- Simmering the sauce or broth in the dish that needs to evaporate and reduce or thicken.
- Adding more than fragile or no-cooking-required ingredients like baby spinach, fresh tomatoes, fruit, cheese, milk or foam.
- Thickening sauce with butter, cream or flour.
- Making not-pressure cooked dishes like scrambled eggs or quick and like shooting fish in a barrel zucchini noodles
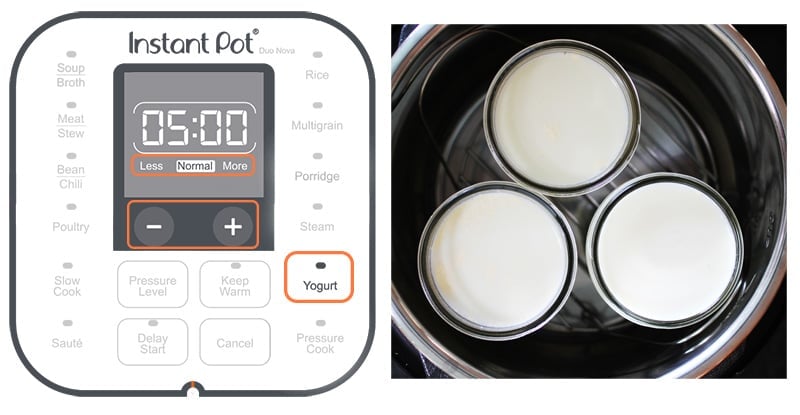
INSTANT POT YOGURT SETTING
The Yogurt button is a non-pressure cooking Smart Program fabricated for easily fermented dairy and non-dairy recipes. The setting modes Less, Normal and More are used for different times of fermentation or for boiling (pasteurizing) the milk. Below are some basic steps and setting options for making yogurt using the Yogurt setting push button.
PASTEURIZING/HEATING MILK
- Add milk to the inner pot. A minimum of 4 cups of milk is recommended for a six-quart Instant Pot (2 cups for 3-quart and 6 cups for 8-quart). Secure and close the lid. Make certain to press the quick-release button down until information technology clicks and locks into the Vent position. On Duo Classic, turn the steam release manus to point to Venting. Do this before you select the settings and make any adjustments.
- Select Yogurt setting. The default style is Normal. Press Yogurt again to cycle to the More option. The display indicates boiL. Subsequently 10 seconds the cooker begins heating. This setting fashion tin can be used to pasteurize the milk only is also there for heating the milk earlier adding to the starter culture. When pasteurization/heating completes, the brandish indicates End.
Calculation STARTER CULTURE
- Remove the hat and use a thermometer to check the temperature. Annotation: Milk must reach a minimum of 72°C (161°F) for pasteurization to occur (if that is what you're after). Allow hot milk to cool to just below 43°C (110°F), you lot tin transfer it to a bowl and place in an iced bath to speed up the procedure.
- Once at the right temperature, add a starter culture to the milk co-ordinate to package instructions. Y'all can also use plain yogurt as a starter, ensure that it contains an active civilisation. Apply 2-three tablespoons of yogurt for iv cups of milk.
FERMENTING YOGURT
- Once your warm milk and civilisation mixture is in the inner pot, secure and lock the Instant Pot lid again, making sure the quick release push is clicked into Vent position (or steam release handle is pointing to Venting).
- Printing Yogurt again to cycle to the Normal option. The display indicates 08:00 hours. Use the − / + buttons to accommodate the fermentation time if desired (up to 99 hours and 30 minutes). Longer fermentation will upshot in tangier yogurt. After 10 seconds the cooker begins heating. The display timer counts upwards to the prepare time from 00:00. When fermentation completes, the cooker beeps and displays End.
- Transfer to storage containers; embrace and chill until cold, nigh half-dozen-eight hours, or up to 10-14 days.
- The Less way is used for lower temperature fermentation (e.thou. Jiu Niang, a sweet fermented gluey rice dessert) and the default time is set to 24 hours. Use the− / + buttons to further customize the time according to the recipe.
HOW TO Make INSTANT POT YOGURT CUPS
Yogurt cups are a convenient way to portion out your yogurt into individual or smaller servings. Subsequently adding the starter culture to the pasteurized or warm milk, carefully pour the milk into your cups and seal them tightly. Clean the inner pot thoroughly and place the steam rack/trivet on the bottom of the inner pot. Place the sealed yogurt cups on the steam rack and add together water to the inner pot until the cups are submerged halfway. Follow the steps in "Fermenting Yogurt" to a higher place.
Continue WARM SETTING
This setting keeps the contents of the pot at a low temperature to maintain rut for serving. The Proceed Warm setting turns on automatically after cooking on all Smart Programs (including Manual settings) except Sauté and Yogurt. It is fix to count upwards from 00:00 to 10 hours and will then automatically switch off.
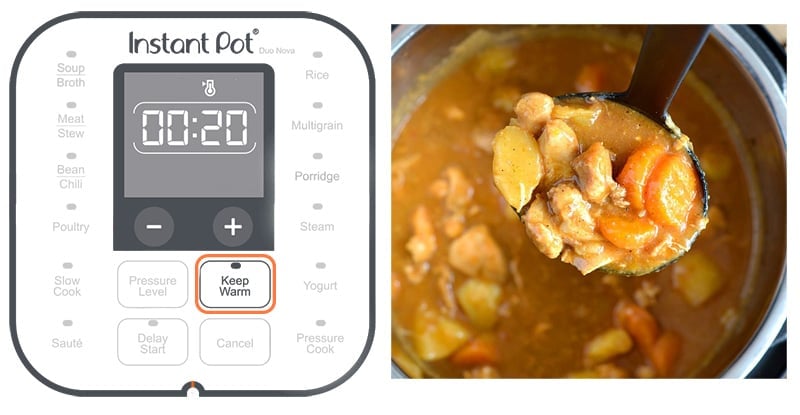
If you don't want to keep the nutrient warm after cooking, you tin printing the Keep Warm button again to turn information technology ON or OFF. Do this after yous take selected 1 of the smart programs or manual settings, or at the end of the cooking process.
Yous can likewise change the temperature at which the food is kept warm. While in Stand-By mode (when the display shows OFF), press the Keep Warm push button to cycle through Normal (145 F), Less (135F) and More (167F) temperature modes. Please note that the temperature will exist remembered for next time.
Use the − / + buttons to set a warming timer up to 99 hours and 50 minutes.
DELAY Starting time SETTING
This setting button allows you to set the Instant Pot to begin cooking later. It tin be set to a minimum of 10 minutes or a maximum of 24 hours.
- Select a Smart Plan and adjust the settings as yous desire, so press Delay Start. Note: Once Delay Commencement has been selected, there is no mode to return to the cooking settings. To adjust Smart Program settings, press Cancel and enter new selections.
- When the timer field flashes, use the − / + buttons to adjust the delay time. E.thou., 02:00 indicates that cooking will start afterwards 2 hours.
- Press Delay Get-go again to toggle to the minutes field and follow the same process every bit the previous step.
- Delay First begins automatically subsequently 10 seconds and the timer counts down. When Delay Start ends, the Smart Program begins, and the display indicates On.
- Delay First is not available with the Sauté or Yogurt Smart Programs
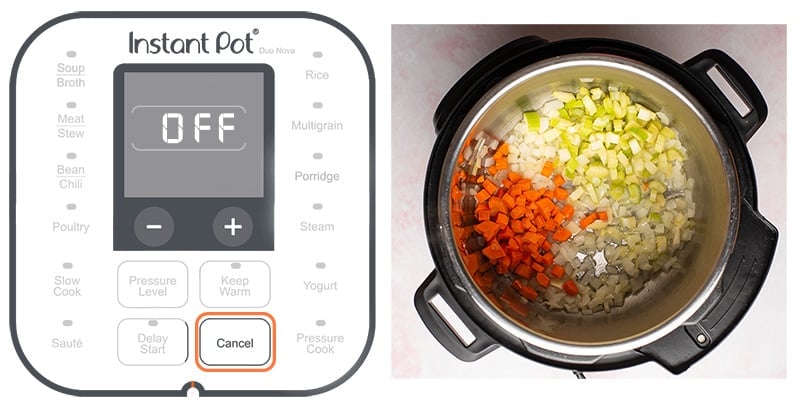
CANCEL/Stand-BY SETTING Push
When the cooker is plugged in but not in operation, the display reads OFF to indicate Standby way. Press Cancel to terminate a Smart Program or Transmission cooking at whatever time. The cooker returns to Standby mode.
Block setting
This loftier-pressure mode creates a very moist, dumbo block. For a lighter, moister cake, use the Less style; for a denser cake, use the Normal manner; for a really dumbo cake, such equally a New York Style cheesecake, utilize the More than mode. You will need to utilize a trivet/steam rack and a cake pan, ideally covered with foil. Use Natural Release after cooking is consummate.
Egg setting
This program is designed for cooking extra-big eggs, and then you may need to adjust the time for smaller eggs. For a soft-cooked egg, employ the Less mode; for a medium cooked egg, utilise the Normal style; for a difficult-cooked egg, utilise the More mode. Plunge eggs into an ice bath afterwards to foreclose overcooking. Use quick release afterwards cooking is complete.
Sterilize setting
This program is designed for sterilizing baby bottles, jars, and utensils. Use the Less mode (no pressure steam sterilization at 181F) to pasteurize dairy products and sterilize tempered glass and heat-resistant plastics. Normal mode (low pressure hot h2o bathroom canning at 230F) or More (high pressure hot water bathroom canning at 239F) for sterilization of baby bottles, jars, utensils and h2o-bath canning of acidic fruits and vegetables.
With each new model of the Instant Pot, at that place seem to be more settings and functions merely the good affair is that the most common 9-ten settings are always the aforementioned. We hope that this guide has cleared up whatsoever confusion y'all might take had near the Smart program buttons.
As nosotros mentioned at the start, the beauty of the Instant Pot is that you lot can choose to use the pre-program settings or you can replicate them and have more control with Manual/Pressure Cook settings. Once you sympathize what they practise and experiment with using them for different foods, y'all will get a improve idea of what to use and when.
If you have whatever further questions about the SMART PROGRAM settings or you've found a new way to employ them, let us know in the comments below.
Source: https://instantpoteats.com/instant-pot-settings-buttons-explained/
0 Response to "How To Set The Time On Instant Pot"
Post a Comment